
APatch是什么
- 一种基于内核修补(Kernel Patching)的 Android Root 方案,核心是 KernelPatch。
- 提供内核模块机制,支持动态装载、动态卸载、符号管理等
- 提供 syscall hook、inline hook 接口,方便定制修改内核
- 与 Magisk 的区别:
APatch 直接修改内核实现功能,而非通过 Zygote 注入用户空间。更适合深度内核级定制(如隐藏 Frida)。
内核分析与提取
系统调用(System Call)
- 作用:用户态与内核态交互的安全接口
- Hook 意义:拦截系统调用是隐藏痕迹的核心手段
(如监控文件访问openat、进程信息读取read) - 定位关键:需通过内核符号表查找系统调用处理函数
(如__arm64_sys_openat)
arm64系统调用符号表: https://blog.xhyeax.com/2022/04/28/arm64-syscall-table/
内核符号(Kernel Symbols)
- 查看符号导出配置:
zcat /proc/config.gz | grep CONFIG_KALLSYMS - 获取所有导出符号:
cat /proc/kallsyms
如何提取kernel内核?(物理设备)
提取 boot.img -> dd 提取kernel -> magiskboot 重建符号表 -> vmlinux-to-elf IDA载入
- 查看boot挂载 ls /dev/block/bootdevice/by-name -l |grep boot
1
2
3
blueline:/ $ ls /dev/block/bootdevice/by-name -l |grep boot
lrwxrwxrwx 1 root root 16 1970-04-30 12:52 boot_a -> /dev/block/sda11
lrwxrwxrwx 1 root root 16 1970-04-30 12:52 boot_b -> /dev/block/sda12 - dd 命令提取 dd if=/dev/block/sda11 of=/sdcard/boot_a.img (一般默认是第一个)
root权限下执行:1
2
3
4
5
6
7
8
9
10blueline:/ $ dd if=/dev/block/sda11 of=/sdcard/boot_a.img
dd: /dev/block/sda11: Permission denied
0+0 records in
0+0 records out
0 bytes (0 B) copied, 0.000146 s, 0 B/s
1|blueline:/ $ su
blueline:/ # dd if=/dev/block/sda11 of=/sdcard/boot_a.img
131072+0 records in
131072+0 records out
67108864 bytes (64 M) copied, 13.041891 s, 4.9 M/s - 搜索 magiskboot 程序
1
2
3blueline:/ # find / -name magiskboot 2>/dev/null
/data/adb/magisk/magiskboot
/data/adb/ap/bin/magiskboot - 提取kernel: magiskboot unpack /sdcard/boot_a.img
1
2
3
4
5
6
7
8
9
10
11
12
13
14
15
16
17
18blueline:/data/adb/magisk # ./magiskboot unpack /sdcard/boot_a.img
Parsing boot image: [/sdcard/boot_a.img]
HEADER_VER [1]
KERNEL_SZ [20902609]
RAMDISK_SZ [9380449]
SECOND_SZ [0]
RECOV_DTBO_SZ [0]
OS_VERSION [9.0.0]
OS_PATCH_LEVEL [2019-07]
PAGESIZE [4096]
NAME []
CMDLINE [console=ttyMSM0,115200n8 androidboot.console=ttyMSM0 printk.devkmsg=on msm_rtb.filter=0x237 ehci-hcd.park=3 service_locator.enable=1 firmware_class.path=/vendor/firmware cgroup.memory=nokmem lpm_levels.sleep_disabled=1 usbcore.autosuspend=7 buildvariant=user]
CHECKSUM [9183e0d7f1dd8c679304844924b78f226ae61664000000000000000000000000]
KERNEL_DTB_SZ [862480]
KERNEL_FMT [lz4]
RAMDISK_FMT [gzip]
unexpected ASN.1 DER tag: expected SEQUENCE, got APPLICATION [1] (primitive)
VBMETA - 使用vmlinux-to-elf把内核转换成可分析的kernel.elf
将 kernel push到pc端使用vmlinux-to-elf工具, https://github.com/marin-m/vmlinux-to-elf.git1
2
3
4
5
6
7
8
9
10
11
12
13
14
15
16
17
18
19
20
21
22
23
24
25
26➜ vmlinux-to-elf git:(master) ✗ ./vmlinux-to-elf kernel kernel.elf
/Users/zskkk/Downloads/vmlinux-to-elf/vmlinux_to_elf/elf_symbolizer.py:101: SyntaxWarning: invalid escape sequence '\('
"""
[+] Version string: Linux version 4.9.148-g02e4d6af1113-ab5555671 (android-build@abfarm032) (Android clang version 5.0.1 (https://us3-mirror-android.googlesource.com/toolchain/clang 00e4a5a67eb7d626653c23780ff02367ead74955) (https://us3-mirror-android.googlesource.com/toolchain/llvm ef376ecb7d9c1460216126d102bb32fc5f73800d) (based on LLVM 5.0.1svn)) #0 SMP PREEMPT Fri May 10 20:41:11 UTC 2019
[+] Guessed architecture: aarch64 successfully in 0.58 seconds
[+] Found relocations table at file offset 0x26f19c0 (count=218991)
[+] Found kernel text candidate: 0xffffff8008000000
WARNING! bad rela offset ffffff800b061810
[+] Found kallsyms_token_table at file offset 0x01e97900
[+] Found kallsyms_token_index at file offset 0x01e97d00
[+] Found kallsyms_markers at file offset 0x01e96300
[+] Found kallsyms_names at file offset 0x01c34a00
[+] Found kallsyms_num_syms at file offset 0x01c34900
[!] WARNING: Less than half (0%) of offsets are negative
You may want to re-run this utility, overriding the relative base
[!] WARNING: More than half (100%) of offsets look like absolute addresses
[!] You may want to re-run this utility, overriding the relative base
[i] Note: sometimes there is junk at the beginning of the kernel and the load address is not the guessed
base address provided. You may need to play around with different load addresses to get everything
to line up. There may be some decent tables in the kernel with known patterns to line things up
heuristically, but I have not explored this yet.
[i] Negative offsets overall: 0 %
[i] Null addresses overall: 0 %
[+] Found kallsyms_offsets at file offset 0x01b84ffc
[+] Base address fallback, using first_symbol_virtual_address (37e1000)
[+] Successfully wrote the new ELF kernel to kernel.elf
如何提取kernel内核?(AARCH64模拟器)
- 直接在宿主文件系统找到压缩镜像文件 /Users/xxxx/Library/Android/sdk/system-images/android-34/google_apis/arm64-v8a/kernel-ranchu
- 添加 .gz,然后用 gunzip kernel-ranchu.gz 解压,得到 kernel-ranhu
1
2
3
4cp kernel-ranchu kernel-ranchu_copy.gz
gunzip kernel-ranchu.gz
或者一行:
gunzip -c kernel-ranchu > kernel - kernel-ranchu 就是解压后的 kernel 文件,用 vmlinux-to-elf 处理即可得到带符号的内核elf
如何安装APatch(物理设备)
参考官方文档:https://apatch.dev/zh_CN/install.html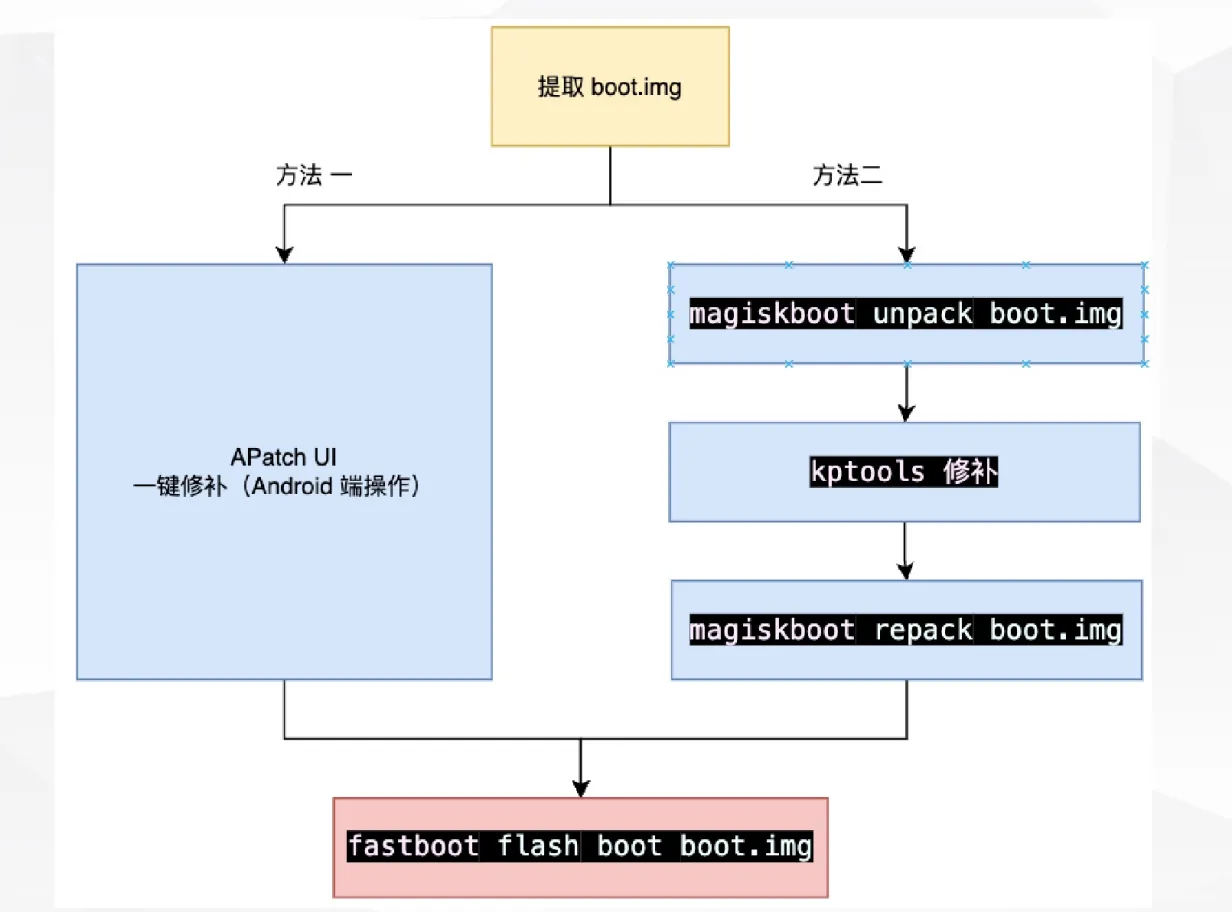
如何安装APatch(模拟器设备)
创建设备,进到对应的镜像目录下,如:
/Users/zskkk/Library/Android/sdk/system-images/android-34/google_apis/arm64-v8a
由于虚拟机没有boot.img,使用mkbootimg工具对 kernel-ranchu 和 ramdisk.img 合并成 boot.img
https://android.googlesource.com/platform/system/tools/mkbootimg
命令:
1 | python /Users/zskkk/Downloads/mkbootimg/mkbootimg.py --kernel kernel-ranchu --ramdisk ramdisk.img -o boot.img |
将 boot.img push到设备上进行修补后,使用 unpack_bootimg.py 对boot.img进行解包,如果使用下面的需要进到根目录执行 make
https://github.com/osm0sis/mkbootimg.git
命令:
1 | ./unpackbootimg -i /Users/zskkk/Downloads/apatch_patched_11039_0.11.2_qfyb.img |
1 | ➜ mkbootimg git:(master) ✗ ls |
1 | mv apatch_patched_11039_0.11.2_qfyb.img-kernel kernel-ranchu |
然后启动设备使用禁止快照
1 | ➜ emulator pwd |
Kernel Patch Module开发
环境:
AArch64 交叉工具链
下载地址:https://developer.arm.com/downloads/-/arm-gnu-toolchain-downloads
- host: Macos / Linux
- target: bare-metal target(aarch64-none-elf)
下载后解压到某个位置,设置环境变量
export TARGET_COMPILE=/Users/xxx/arm-gnu-toolchain/bin/aarch64-none-elf-
IDE配置(VSCode + Clangd):
- 安装bear:生成clangd所需的辅助文件 compile_commands.json
- bear 从 make 命令运行生成
kpm hello world模块
目录结构
KernelPatch (https://github.com/bmax121/KernelPatch)
src
main.c
Makefile
kpm模块组成
模块描述,导入 #include <kpmodule.h> 后定义
1 | ///< The name of the module, each KPM must has a unique name. |
装载回调 / 卸载回调 / 控制回调
- 回调函数使用如下宏静态注册
1
2
3
4KPM_INIT(inject_hide_init); // 装载回调
KPM_CTL0(inject_hide_control0); // 控制0回调
KPM_CTL1(inject_hide_control1); // 控制1回调
KPM_EXIT(inject_hide_exit); // 卸载回调
装载回调,执行模块初始化代码,比如安装 Hook
1 | static long inject_hide_init(const char *args, const char *event, void *__user reserved) |
卸载回调,执行模块卸载代码,比如卸载 Hook
1 | static long inject_hide_exit(void *__user reserved) |
控制回调,用户态向kpm模块传递控制参数
1 | static long inject_hide_control0(const char *args, char *__user out_msg, int outlen) |
完整main.c
1 |
|
kpm模块编译
- 首次编译可以用 bear – make -B 生成clangd补全文件
会生成一个空的 compile_commands.json 文件,因为先使用了交叉编译工具的gcc,它识别不了,先用gcc来编译, 先将 Makefile 前三行注释掉
1 | # ifndef TARGET_COMPILE |
将环境变量删除,这样就能使用系统的gcc,就会被bear识别到,生成正确的compile_commands.json,只需要生成一次,有报错不影响生成文件
1 | export TARGET_COMPILE= |
再把生成好的compile_commands.json里面 “/usr/bin/gcc” 改为交叉工具的gcc “/Users/zskkk/arm-gnu-toolchain/bin/aarch64-none-elf-gcc”
把注释的还原,把环境变量还原
- 编译模块
1
2
export TARGET_COMPILE=/Users/xxx/arm-gnu-toolchain/bin/aarch64-none-elf-
make - 编译成功后得到 inject-hide.kpm 模块
- make push 命令自动编译 + 推送到 /sdcard/inject-hide.kpm
kpm模块加载
- KPModele(内核模块) 界面,右下角,加载
![image]()
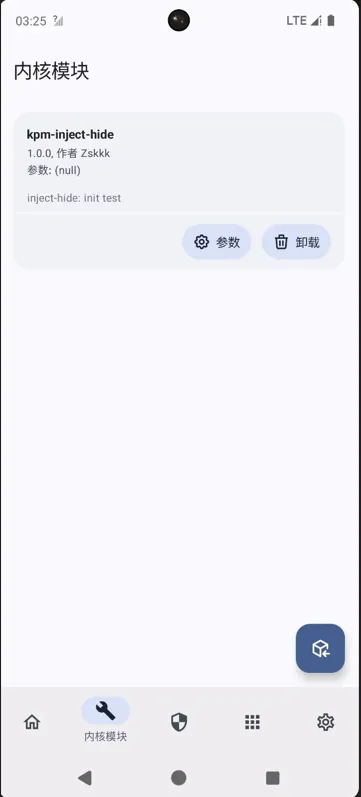
kpm模块日志查看
1 | ➜ ~ adb logcat | grep inject-hide |
Hide debugger
框架搭起来了,在隐藏Frida前先来隐藏debugger练手
有哪些 debugger check 方法?
- /proc/pid/status 文件 TracerPid 字段
- /proc/pid/status 文件 State 字段
- /proc/pid/wchan 文件
- /proc/pid/stat 文件
/proc/pid/status 文件 TracerPid 字段
内核源码定位:proc_pid_status
1 | int proc_pid_status(struct seq_file *m, struct pid_namespace *ns, |
Name 字段有 proc_task_name 函数生成,这个涉及 frida 检测
TracerPid 在 task_state 生成,task_state
1 | static inline void task_state(struct seq_file *m, struct pid_namespace *ns, |
参数一是 struct seq_file 的结构体,seq_file
1 | struct seq_file { |
- 类似一个 StringBuilder 的字符串缓冲区
- buf 指向数据地址
- count 指向数据尾部,表示当前 buf 的长度,buf 空时表示0
该缓冲区的操作函数以 seq_ 开头
- seq_puts
- seq_put_decimal_ull
- seq_putc
proc_pid_status 第一个参数就是该缓冲区
maps / status 文件都使用 seq_file 缓冲区生成
为了方便使用,只需要前4个字段,4个字段的顺序是固定的
seq_put_decimal_ull(m, “\nTracerPid:\t”, tpid);
task_state 调用 seq_put_decimal_ull 把 TracerPid 放到缓冲区
seq_put_decimal_ull 是导出函数
1 | emu64a:/data/local/tmp # cat /proc/kallsyms|grep seq_put_decimal_ull |
导出函数意味着可以找到运行时地址,并hook,然后判断第二个参数是“TracerPid:”时修改第三个参数的值为0
seq_put_decimal_ull hook
1 | #include "kallsyms.h" |
- before hook,注意是3个参数
- 判断确实是添加了 TracerPid,并将参数3点值强制设置为0
使用IDA对随便一个app进行调试,查看它的 status TracerPid 是0,adb logcat 查看日志hook修改成功
1 | 07-01 01:25:45.426 5530 5530 I inject-hide: seq_put_decimal_ull called, TracerPid: 4913 |
/proc/pid/status 文件 State 字段
1 | emu64a:/ # cat /proc/5710/status |
内核源码定位:task_state
1 | seq_puts(m, "State:\t"); |
1 | static const char * const task_state_array[] = { |
- get_task_state 从 task_state_array 获取静态字符串返回
- 调用 seq_puts 写入
前8个是 TASK_REPORT 的状态(可用于用户态工具报告):
| 位标志(bitmask) | 状态字符 | 含义 |
|---|---|---|
0x00 |
R |
Running(运行中) |
0x01 |
S |
Sleeping(可中断的睡眠) |
0x02 |
D |
Disk sleep(不可中断睡眠) |
0x04 |
T |
Stopped(停止,如被 SIGSTOP) |
0x08 |
t |
Tracing stop(被调试器跟踪时停止) |
0x10 |
X |
Dead(任务终止,尚未清理) |
0x20 |
Z |
Zombie(僵尸进程) |
0x40 |
P |
Parked(暂时不参与调度) |
后面是非 TASK_REPORT 的特殊状态:
| 位标志(bitmask) | 状态字符 | 含义 |
|---|---|---|
0x80 |
I |
Idle(空闲任务) |
seq_puts hook
1 | void * seq_puts = 0; |
效果
1 | emu64a:/ # cat /proc/5710/status |
/proc/pid/wchan 文件
内核源码定位:proc_pid_wchan
1 | static int proc_pid_wchan(struct seq_file *m, struct pid_namespace *ns, |
- wchan 文件内容是内核中进程休眠位置对应的符号名称,比如等待调试器就是 ptrace_stop,正常情况是0
没被调试
1 | emu64a:/ # cat /proc/5710/wchan |
被调试
1 | emu64a:/ # cat /proc/5710/wchan |
方法1:before hook,向 seq_file 写入0字符,count+1
方法2:after hook,覆盖 seq_file 数据,写入 0,把 count 改成1
proc_pid_wchan hook
1 | struct seq_file{ |
/proc/pid/stat 文件
非调试情况
1 | emu64a:/ # ps -A|grep me.bmax.apatch |
调试情况
1 | emu64a:/ # ps -A|grep me.bmax.apatch |
或者 ps -A |grep me.bmax.apatch
内核源码定位:do_task_stat
1 | static int do_task_stat(struct seq_file *m, struct pid_namespace *ns, |
- seq_putc 放入1个字节
- 不能 hook seq_putc
- 不能特异性区分
怎么办?
- 检测 seq_file 内容
- after hook do_task_stat 检测右括号+空格后的1字节是否为 t
do_task_stat hook/proc/[pid]/stat 是由 do_task_stat() 向 struct seq_file 写入格式化字符串,我们必须在它完成写入后,修改其输出缓冲区(m->buf)内容
1 | void after_do_task_stat(hook_fargs5_t *args, void *udata) |
Hide Frida
有哪些 frida check 方法?
- maps 文件特征
- 内存特征
- 线程名特征
- D-BUS 端口特征
![image]()

maps 文件特征与内存特征
使用frida对app注入后,/proc/pid/maps 文件内容描述了进程的内存布局信息,frida 会注入一个 frida-agent 模块,因此在 maps 里面能找到对应的内存映射信息。
1 | emu64a:/ # cat /proc/11727/maps |grep frida |
内存特征,可以扫描 maps 里面的内存,寻找 frida 特征,比如:frida-rpc、FridaScriptEngine、以及一些不可见的 bytes 特征,都在 frida-agent 段里面。所以可以直接在内核层面修改maps文化,隐藏frida相关的内存,同时绕过maps检测和内存特征检测
负责写入 /proc/self/maps 文件的内核函数为 show_map_vma,内核源码定位:show_map_vma
1 | static void |
show_map_vma 函数输出 maps 文件中的一段(一行)内存区域
使用哪种hook?
- after hook 中如何从 seq_file 中删除当前 show_map_vma 输出的全部数据,而不影响其他调用数据?
- before hook 记录 seq_file 中的count,在 after hook 中设置 count 为记录值,效果上等价删除
show_map_vma hook
1 | // 内核环境下的 memmem 实现 |
线程名特征
1 | adb shell "for taskdir in /proc/self/task/*; do cat "\$taskdir/status" |grep 'Name:'; done" |
1 | ➜ ~ adb shell "for taskdir in /proc/4348/task/*; do cat "\$taskdir/status" |grep 'Name:'; done" |
status 文件的 Name 字段是 frida 注入后启动的特有线程,线程名集合:gmain、gum-js-loop、ggdbus、pool-frida、linjector
内核源码定位:proc_pid_status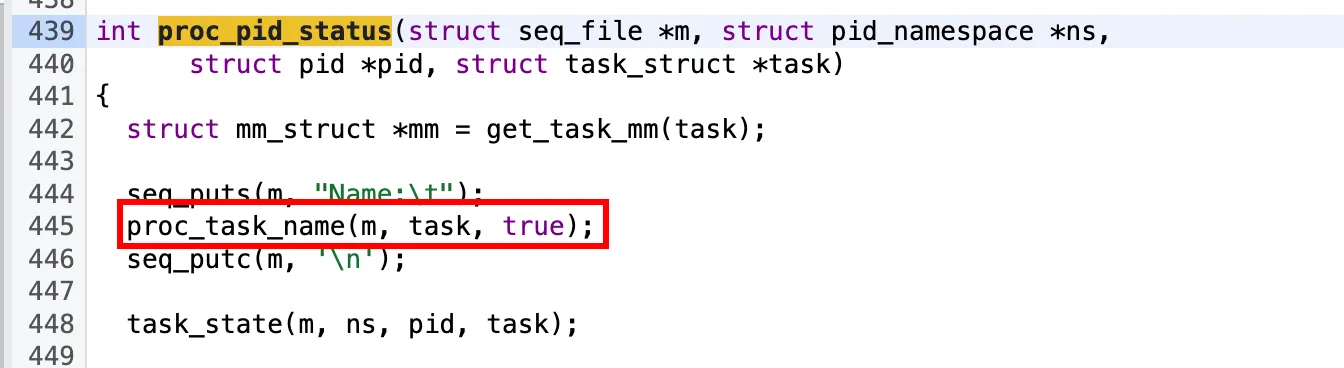
注意:官方显示的内核版本是新的,proc_task_name 源码跟老版本的会有出入,可以根据内核版本号在下面网站查看
https://elixir.bootlin.com/linux/v6.1.23/source/fs/proc/array.c#L98
1 | void proc_task_name(struct seq_file *m, struct task_struct *p, bool escape) |
1 | char *__get_task_comm(char *buf, size_t buf_size, struct task_struct *tsk) |
proc_task_name 会调用 __get_task_comm 获取进程/线程名
函数返回的是 buf,可以使用 after hook 检测 buf 缓冲区,检测到关键词就替换成空格
__get_task_comm hook
1 | char *(*__get_task_comm)(char *buf, size_t buf_size, struct task_struct *tsk) = 0; // 为了后续能够调用,定义成函数指针变量 |
效果
1 | ➜ ~ adb shell "for taskdir in /proc/4348/task/*; do cat "\$taskdir/status" |grep 'Name:'; done" |
frida 端口特征
- frida 注入后在目标进程监听 27042 端口,等待外部工具(如 frida-server 或 frida-client)连接
- 只有名为 adbd 的进程会主动连接这个 27042 端口。
adbd 是 Android 设备上的调试守护进程,只有它会通过 adb 端口转发机制连接 frida-agent 监听的 27042 端口,其他普通应用或进程不会主动连接 27042 端口。
1 | struct sockaddr_in { |
最终效果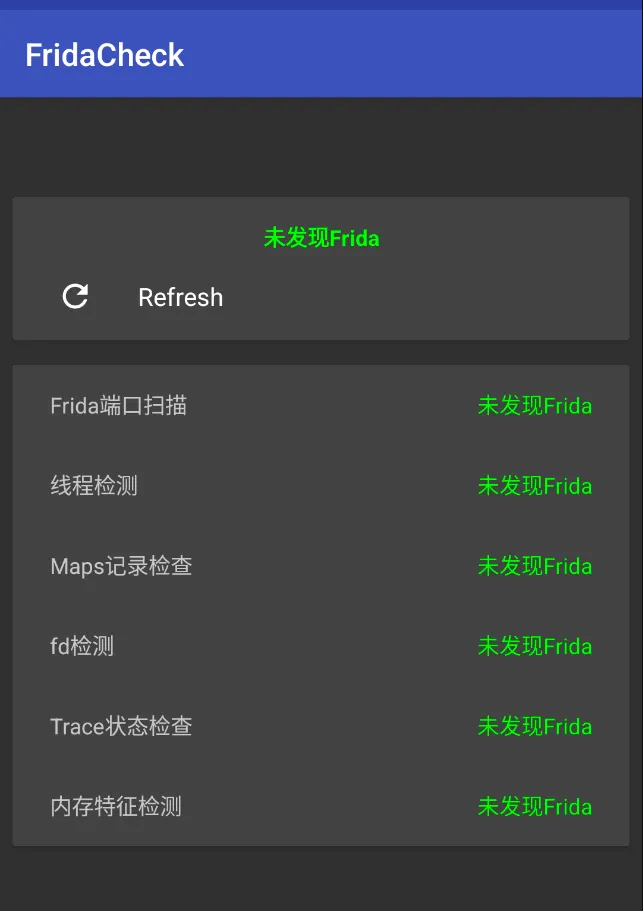
完整代码
1 |
|